The VCOrganizer Outlook AddIn allows user to manage VCOrganizer data using the Outlook interface. You can do the following with this AddIn:
- Link and unlink notes/tasks/events/contacts
- Edit Tasks/Events icon.
- Open the linked items
- Links and Icons can be synced to VCOrganizer on
your Android devices.
- Manage VCOrganizer Attachments in Outlook
Remark:
- You need to upgrade to the latest VCOrganizer (Build 369 or above).
- This is optional program. VCOrganizer can still sync with Outlook without installing this AddIn. But you must need to install SyncCenter on your PC.
 |
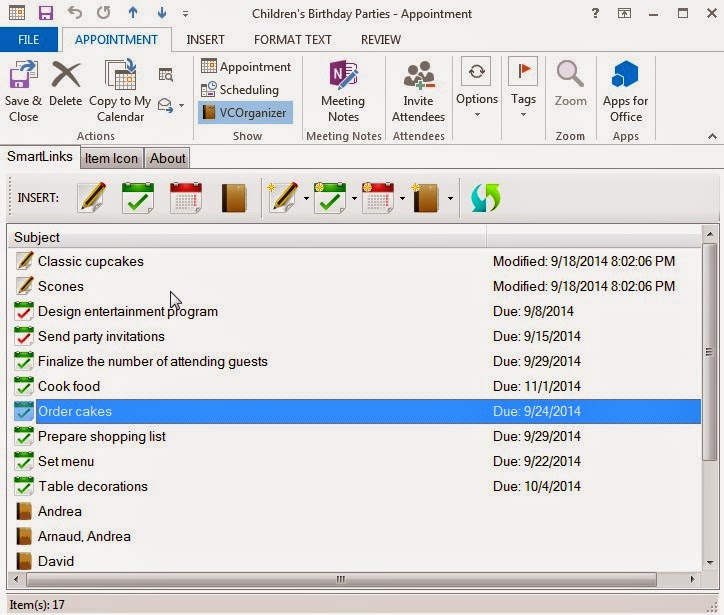
| SmartLinks which links an Outlook Appointment to notes, tasks and contacts |
 |
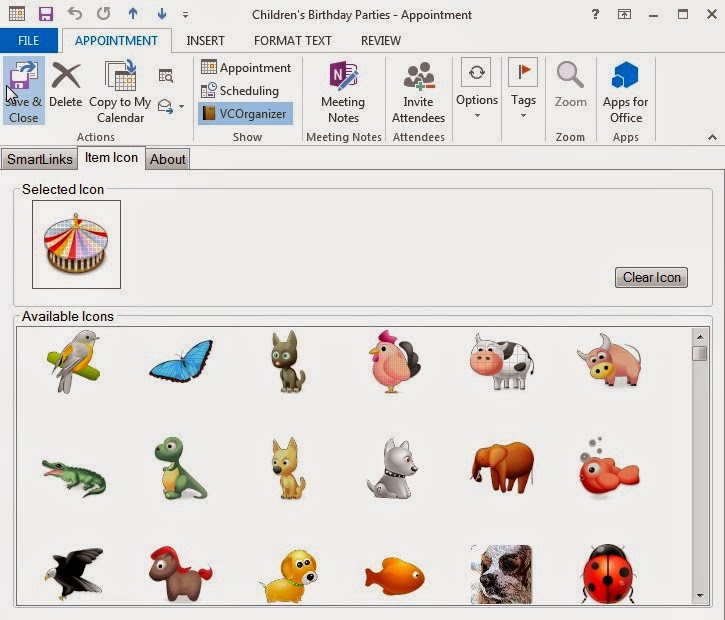
| You can assign icon to Task and Appointment |
Steps to Link Items
The following example will show you how to link the tasks and contacts to an event (Appointment).
Open or create an event from Outlook. Click the VCOrganizer icon (

) in the toolbar to open the VCOrganizer region.
In the VCOrganizer region, you can see the "SmartLinks" and "Icon" tab.
In the "SmartLinks" tab, click the "Add Task" button (

) to open the "Select Tasks" dialog.
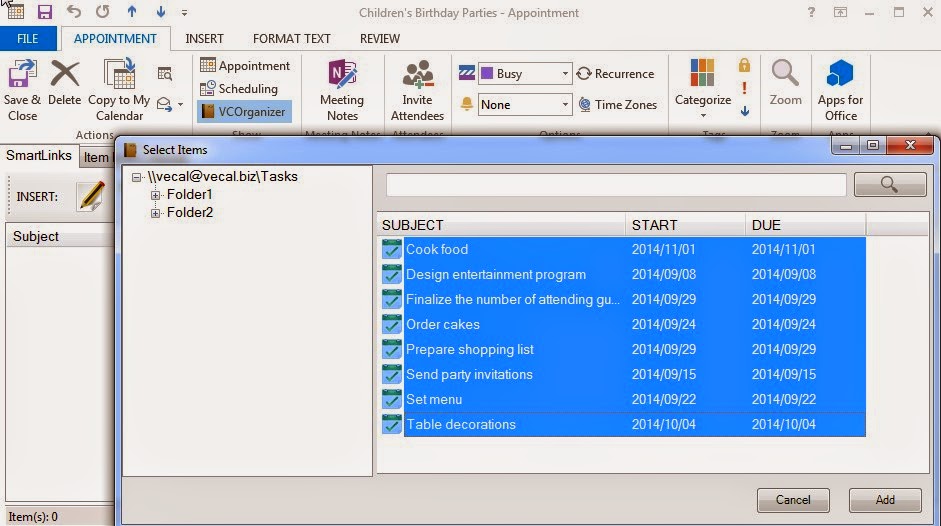
In the "Select Tasks" screen, you can select the tasks you would like to add and then click the "Add" button.
Now, you should see the tasks in the event. To open the linked item, just double-click on the item in the list. To unlink items, select the items from the list and press the delete button on Keyboard or right-click on the items and select the "Unlink Selected Item(s)" from the menu.
You can also create new tasks (notes, events or contacts) and link it to this event directly. To create a new task and link to this event, click the "New Task" button (

). If you want to create the new task in different folder, please select the dropdown menu (next to the New Task button) and select the folder from the dropdown list.
In the Icon tab, you can also assign icon to this event.
When the event is synced to VCOrganizer, you can see the event icon and it's linked items.
To manage the SmartLinks items, tap on the "SmartLinks" icon (

) to open the SmartLinks menu. To add or delete any links, select "Manage SmartLinks". If you want to create a new items, such as creating a new note, select "Create Linked Note".
In the Manage SmartLinks screen, you can add/delete any links. To add items, you can tap on the Events, Tasks, Notes or Contacts icon in the toolbar.
Additional Information
- When you link items in subfolders, if you are using VCO Pro, you will only see the tems in the default folder to VCO Pro on your device. It's because VCO Pro only sync items in the default folders.
- If you are using VCO Enterprise+ or VCOrganizer Pro with Enterprise extension, you will see the linked items that created in the subfolders.
- The SmartLinks internal format has been changed. For items with old format, the SmartLinks information won't sync to Outlook. To upgrade to the new SmartLinks, open the item and select "Manage SmartLinks" from the SmartLinks icon. It will upgrade automatically.
Manage VCOrganizer Attachments in Outlook
Due to the limitation of Outlook, you can usually attach files up to 10M in total. However, there is no limit in VCOrganizer. When you sync files from VCOrganizer to Outlook, the file will first been added to the default Outlook item. If it reaches the limit, the files will be stored in SyncCenter Vault on your PC (C:\Users\<username>\AppData\Local\Vecal\VCOrganizer\vault\external).
With the VCOrganizer Outlook AddIn, you view the files that SyncCenter stored in SyncCenter Vault. You can also add or delete any files from the AddIn.
To view the attachments in SyncCenter Vault, click the "VCOrganizer" button in Outlook to open the AddIn, then, click the "Attachments" button.
To add files:
Click the Add button and select files.
Drag the files from Windows File Explorer to the Attachments list.
Select the files from Windows File Explorer, press Ctrl+C to copy the files, and press Ctrl+V in the Attachments list to paste the copied files.
To delete files:
Select the files from attachments list, and press the "Delete" button or right click and select "Delete" from the menu.
To copy files from Attachments list to other directories on your PC:
VCOrganizer AddIn allows users to easily copy the files to any directories on your PC.
Select the files from the attachments list, and press the Ctrl+C. You can then paste the files to any folder you want. Just like the normal Windows Copy/Paste.
Attachments in Outlook Item Note.
Attachments in VCOrganizer Vault
Backup SyncCenter Vault on your PC
On your PC there are two directories in the SyncCenter Vault:
1. C:\Users\<username>\AppData\Local\Vecal\VCOrganizer\vault\external
This is where the files are stored in SyncCenter. If you backup your Outlook data and restore to other PC, you also need to copy this folder (including all the files and subfolders in this directory) to your new PC. Depend on the username of your new PC, on your new PC, please use the <username> of your new PC, instead of the <username> of the old PC.
For example:
If the username of old PC is "Peter" and the username of your new PC is "PeterPon"
Copy the folder C:\Users\peter\AppData\Local\Vecal\VCOrganizer\vault\external from your old PC to the C:\Users\PeterPon\AppData\Local\Vecal\VCOrganizer\vault\external on your new PC
2. C:\Users\<username>\AppData\Local\Vecal\VCOrganizer\vault\,outlook
This is the folder to cache the Outlook attachments. There is NO NEED to backup this folder. Also, there is no need to migrate the content in this folder to your new PC. The cache will be re-created when you sync your new PC with VCOrganizer.


